Pack a compact repair kit—pole‑repair sleeves, Tenacious or Gorilla tape, a needle with waxed thread or dental floss, seam sealer, Krazy glue, paracord, safety pins, a multi‑tool, zip‑lock bags, and a firestarter. Clean a torn area with rubbing alcohol, let it dry, then cover the hole with self‑adhesive tape extending at least an inch beyond the edge, press firmly with a spoon, and smooth out bubbles. For larger tears, backstitch with strong nylon thread, apply Seam Grip glue, press the patch, and seal with canvas cement; reinforce broken poles by sliding a metal sleeve over the break or wrapping a curved plastic bottle piece with tape and re‑attaching the shock cord. Finish by coating seams with silicone sealant, letting it cure, testing waterproofness, and storing supplies dry; the next steps will show you how to keep everything organized for future trips.
TLDR
- Clean the torn area with rubbing alcohol or soapy water, extending at least ¾ inch beyond the damage, then let it dry completely.
- Apply self‑adhesive tape (Tenacious, Gorilla, or heavy‑duty nylon) over the tear, covering at least 1 inch past the opening, and press firmly to eliminate bubbles.
- For larger canvas tears, backstitch with strong nylon thread in a zig‑zag pattern, then reinforce with Seam Grip glue and seal with canvas cement.
- Reinforce broken poles by sliding a metal repair sleeve over the break and securing with tape, or use a curved plastic bottle segment and shock cord as an ultra‑light fix.
- Seal all repaired seams with a thin coat of silicone‑based sealant, allow it to cure in shade, test waterproofness, then pack supplies dry and organized.
Gather Essential Repair Gear for Tent Repair
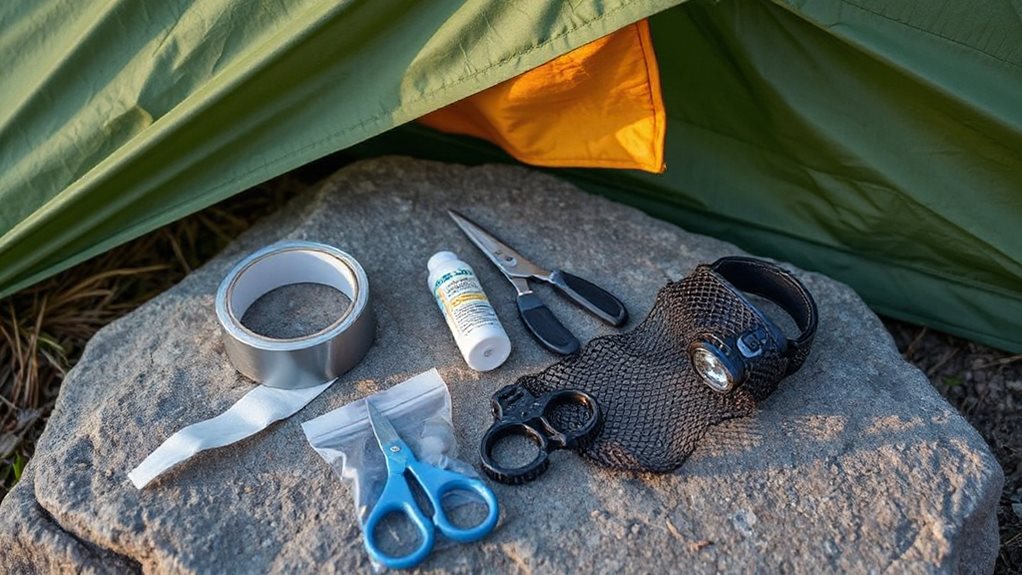
A well‑stocked repair kit is the first step toward fixing a torn tent quickly and reliably, so gather the essential gear before you head out.
Pack a pole‑repair sleeve, shock cord, ferrules, and zip ties for structural fixes; Tenacious tape, heavy‑duty nylon tape, and Gorilla tape for fabric patches; a needle with waxed thread or dental floss for sewing; seam sealer and Krazy glue for waterproofing; plus paracord, safety pins, a multi‑tool, and zip‑lock bags for versatile, on‑the‑go solutions. Include a firestarter as a back‑up item. Consider adding a small pouch with durable rubber patches and extra fabric to handle high‑wear areas and extend repair life.
Patch Small Fabric Holes for Quick Tent Repair
Ever notice a tiny hole in your tent’s fabric and wonder how to fix it without a full‑scale repair? Clean the area with rubbing alcohol or soapy water, extending three‑quarters of an inch beyond the hole, then let it dry completely. Choose a self‑adhesive tape that covers at least an inch past the opening, cut rounded corners, press firmly with a spoon, eliminate bubbles, and allow 24 hours to cure before packing up. The Gauley River is known for world‑class whitewater and attracts experienced paddlers to its challenging rapids, especially during fall releases and festivals like Gauley Fest — a great example of world‑class whitewater.
Sew and Glue Canvas Tears for Durable Tent Repair

When a canvas tear threatens the integrity of your tent, a combination of sewing and gluing offers the most durable fix, letting you reinforce the fabric from both sides and keep the structure weather‑tight. Clean the area, trim frayed edges, then backstitch with strong nylon thread using a zigzag pattern. Apply Seam Grip glue to the patch, press, and let cure 24 hours. Finally, seal the seam with canvas cement for extra weather‑tightness. For best results in the field, keep your repair area chilled on ice beforehand to firm the fabric and ease handling, and consider using a flexible blade to trim and shape patches precisely.
Reinforce Broken Poles With Sleeves, Splints, or DIY Stakes
Poles that have snapped or cracked can be salvaged quickly with a few simple techniques, so you don’t have to abandon your campsite.
Slide a metal repair sleeve over the break, center it, then tape both ends securely; if a sleeve isn’t handy, align a stake alongside the split and wrap it tightly.
For ultra‑light fixes, cut a curved plastic bottle segment, tape it around the break, and re‑attach shock cord with pliers, ensuring smooth, reliable reinforcement.
Wearing a helmet can significantly reduce head injury risk in climbing and fall scenarios, so consider carrying lightweight protective gear if your trip involves climbing risks.
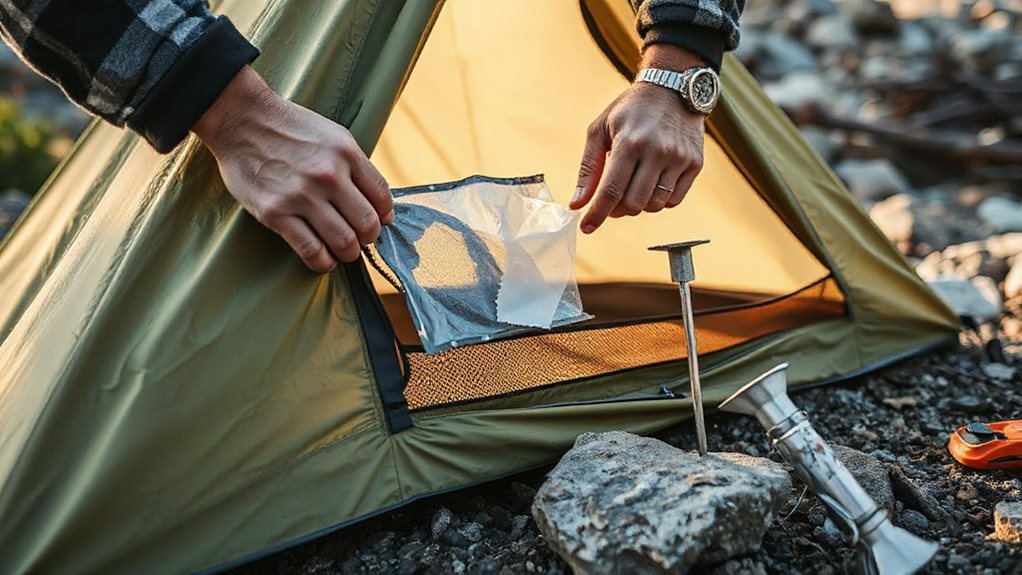
Straighten Bent Pegs and Patch Mesh Panels for Complete Tent Repair
You can straighten a bent peg in seconds by inserting a length of paracord through its eyelet, creating a leverage point, and gently hammering it back into shape, then secure a temporary reinforcement with a PVC elbow joint if the stake is still weak.
For mesh panels, apply Tenacious Tape or a Gear Aid patch directly over the tear, press firmly, and smooth the edges with a craft knife for a quick seal.
Finally, reinforce the patched area with a thin layer of clear silicone sealant or seam sealer to keep water out and prevent delamination.
Also pack a basic first aid kit and emergency gear so you can address injuries and signal for help if a repair leads to an incident.
Straighten Pegs Quickly
A bent peg can ruin a night’s shelter, but a few simple tools let you straighten it in minutes. Roll it on a wooden plank, applying gentle pressure, or use an anvil for tougher bends.
Secure the peg in a vice with a notched sanding block and push down, or lightly hammer high and low spots, flipping it each time.
For hollow stakes, fill with sand, bend back, then empty.
This quick routine restores stability, keeping your campsite free and functional.
Secure Temporary Peg Reinforcement
Ever wonder how to keep a tent stable when a peg bends or a mesh panel tears during a sudden storm?
Slip a screw‑in peg into the ground, using a cordless drill for quick, firm hold, or add a second stake behind the first for double reinforcement.
Toss a sandbag or water barrel nearby for ballast, tighten any bungee cords, and check tension regularly.
This simple, low‑tech fix restores stability without permanent damage.
Patch Mesh Panels Efficiently
Quickly restoring a torn mesh panel starts with a clean work surface and a clear plan: wipe the damaged area with an alcohol wipe, let it dry, then lay the mesh flat and trim away any loose or melted fibers.
Cut a self‑adhesive patch extending at least a quarter inch beyond the tear, align grain, press from the center outward in circles, then repeat on the reverse side.
Sew a zig‑zag seam a quarter inch from edges, trim excess, seal with silicone, and let it cure 24 hours before testing.
Seal, Test, and Pack Up – Final Tent Repair Steps
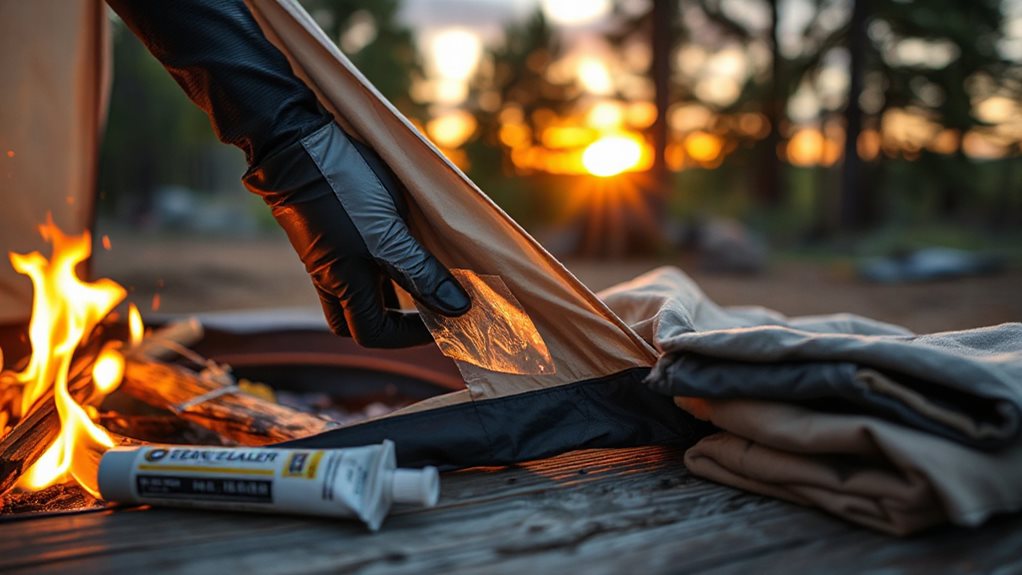
First, you’ll seal the edges with a thin, even coat of the right sealant, brushing it on carefully and letting it cure in a shaded spot for a few hours.
Next, you’ll test the waterproofness by spraying water over the repaired seams and checking for any drips, using a quick rain‑simulation or a hose for a fast check.
Finally, you’ll pack up efficiently—wipe off excess sealant, roll the tent with baby‑powdered seams to prevent sticking, and stash any repair supplies in a dry pocket for future use.
Seal Edges Properly
How do you make sure the repaired seams stay watertight after you’ve sealed them?
Clean each edge with a damp cloth, then wipe with rubbing alcohol or Revivex Pro Cleaner until dry.
Choose a silicone‑based sealant like Seam Grip WP, brush a thin, even layer inside and out, and press with a saturated sponge.
Let it cure 2‑8 hours, apply baby powder if needed, then pack with a DWR spray for lasting freedom.
Test Waterproofness Quickly
Where can you verify that your seal holds up before packing up, and why does a quick field test matter?
Set up the tent, hose the rainfly, and watch water bead and roll off repaired seams.
Pressurize a fabric pocket with a liter, twist until it balloons, and check for drips.
Compare the drop count to a 2,000 mm rating; if three drops seep, re‑seal before you move on.
Pack Repair Materials Efficiently
A well‑organized repair kit saves you time and weight on the trail, so after you’ve sealed and tested the tear, gather your essentials into a compact, ultralight roll‑top stuff sack that weighs under an ounce.
Pack cotton, tape, zip‑ties, and safety pins in zip‑lock bags; wrap duct tape around a bottle; include a tiny sewing kit and paracord.
Secure the sack in a side pocket, then collapse poles, roll everything dry, and inventory for the next excursion.
Final Note
By now you’ve got the basics to fix a torn tent quickly and reliably, from patching holes and sealing seams to reinforcing poles and straightening pegs. Keep your repair kit handy, test the fixes before you set up again, and pack everything neatly for the next excursion. With these steps you’ll extend your gear’s life, stay dry, and enjoy peace of mind on the trail.


