Choose a smart charger that matches your trolling motor battery’s chemistry—like LiFePO4, AGM, or lead-acid—to guarantee safety and full capacity. Match the voltage (12V, 24V, or 36V) and use a 10–25A output for efficient charging. Clean terminals with baking soda, connect red to positive first, then black to negative, and monitor the smart charger’s display or app for real-time updates. Once charged, disconnect in reverse order and store at 50–60% in a cool, dry place. There’s more to get right for long-term performance.
TLDR
- Match the charger to your battery’s chemistry (lead-acid, AGM, gel, or LiFePO4) for safety, performance, and longevity.
- Select a smart charger with correct voltage (12V/24V/36V) and 10–25A output for efficient, multi-stage charging.
- Inspect and clean battery terminals before charging; remove corrosion with baking soda and ensure tight connections.
- Connect charger clamps in order—red to positive, then black to negative—and verify polarity before powering on.
- After charging, disconnect in reverse order, store at 50–60% charge, and keep in a cool, dry place.
Match Your Charger to Trolling Motor Battery Chemistry
While each type of trolling motor battery offers its own benefits, choosing the right charger starts with matching it to your battery’s chemistry—because using the wrong one can shorten its life or even cause damage.
You need a charger designed for lead-acid, AGM, gel, or LiFePO4, as each charges differently.
Picking the correct one guarantees efficiency, safety, and long-term performance—so check your battery specs and choose wisely.
LiFePO4 batteries, known for their enhanced safety and stability, require a specific charging profile that differs from other lithium chemistries due to their unique voltage requirements and thermal characteristics. A properly matched charger will ensure the battery reaches its optimal usable capacity and maximizes cycle life.
Choose the Right Charger Voltage & Amps (12V, 24V, 36V)
Getting your trolling motor the right amount of power starts with choosing a charger that matches your system’s voltage—whether it’s 12V, 24V, or 36V—because using the wrong one can lead to poor performance, longer charge times, or even damage over time.
Pick a smart charger with the correct voltage and 10–25A output, so you charge efficiently, maintain battery health, and stay on the water longer without worry.
Smart chargers also offer automatic multi-stage charging and maintenance features that prevent overcharging and help extend battery life.
Inspect & Clean Terminals Before Charging

Now that you’ve picked the right charger for your trolling motor’s voltage and amperage needs, it’s time to make sure your battery is ready to accept that charge safely and efficiently.
Remove the battery, starting with the negative terminal, and check for corrosion, leaks, or damage.
Clean terminals with a baking soda solution, scrub gently, then rinse and dry thoroughly.
Reconnect the positive first, then the negative, and apply petroleum jelly to prevent future corrosion.
Also inspect the impeller-driven cooling system on your boat’s engine for signs of wear, since a failing impeller can indicate broader maintenance needs.
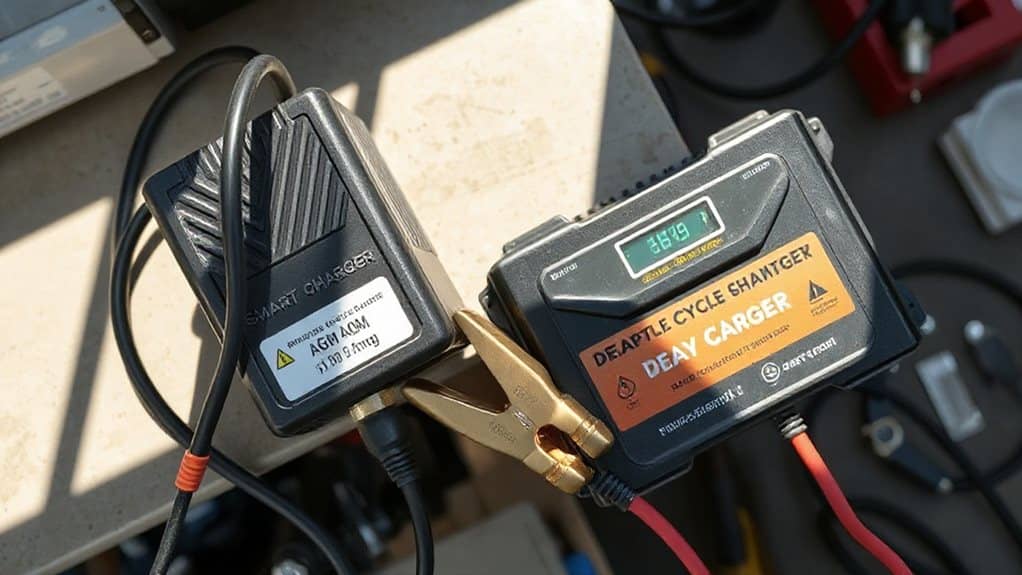
Connect the Charger in the Right Order (Red First, Black Second)
Start by connecting the red charger clamp to the positive (+) terminal of your battery—this one’s usually marked in red, so it’s easy to identify.
Secure the black clamp to the negative (−) terminal afterward, guaranteeing clean, tight connections.
This order reduces the risk of sparks or short circuits, keeps your setup safe, and assures proper polarity.
Always double-check before plugging in.
Ensure your battery and charger are compatible and in good condition to prevent damage and improve charging efficiency, especially when using 12V systems.
Monitor Charging With Smart Indicators & Alerts
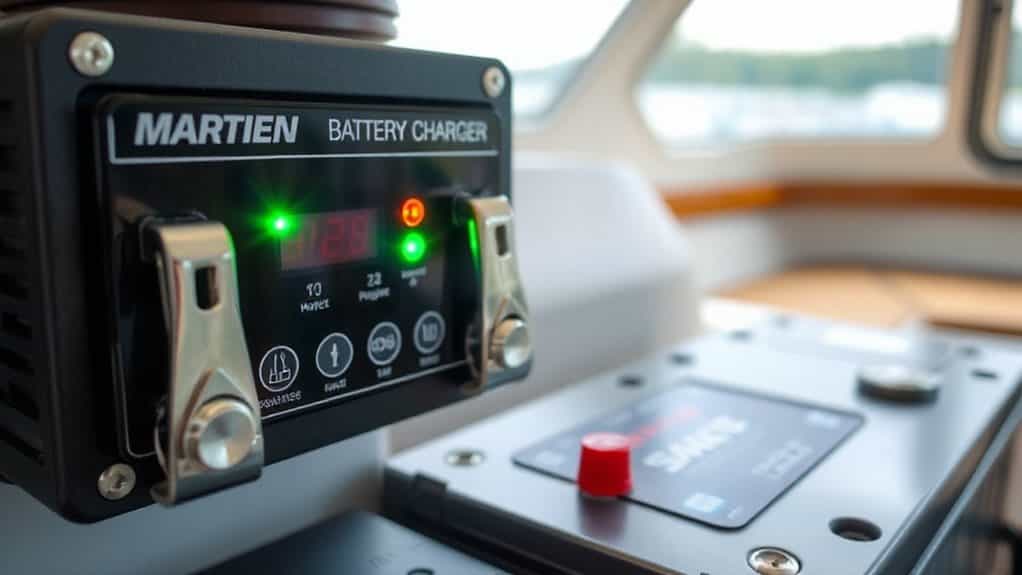
You’ll want to keep an eye on your charger’s display, since most modern units show real-time charging stages and signal when the battery’s full.
If you’ve got a Bluetooth-enabled battery or monitor, just pair it with your phone to get alerts and check the state of charge on the go.
These smart indicators—whether on the charger, a digital meter, or in an app—help you charge safely and efficiently, without guesswork.
Higher-voltage systems like 24V/36V setups require matching chargers and proper battery-bank wiring to ensure safe, efficient charging and longer service life.
Smart Charger Display Features
Keep an eye on your battery’s progress with ease, thanks to smart charger displays that bring clarity and control to every charging session.
You’ll see real-time voltage updates, stage indicators, and LED meters showing charge levels.
Green lights confirm full charge, while apps provide health alerts.
Flashing blue means shunt power is on, and microprocessors adjust voltage automatically—giving you freedom, safety, and confidence on every trip.
Bluetooth Monitoring And Alerts
Tap into the power of modern technology by monitoring your trolling motor battery’s charge right from your smartphone, thanks to built-in Bluetooth connectivity.
You can track voltage, current, temperature, and state of charge in real time, while alerts warn of overcharging or overheating.
With apps like VictronConnect or Amped Outdoors, you stay in control, ensuring peak performance, longer battery life, and worry-free time on the water.
Safely Disconnect & Store After Charging
Once the charger shows your battery is fully charged, turn it off and unplug the negative lead first, then the positive to stay safe.
Clean the terminals with a baking soda mix and a wire brush, making sure they’re dry before you store the battery.
Keep it in a cool, dry spot between 10°C and 30°C, away from metal objects and extreme temps, to maintain its health over time.
Proper Disconnection Sequence
Now that your trolling motor battery’s charge is complete, it’s time to power down the system the right way—safely and in the correct order.
First, turn off the motor and disconnect its leads. Break the circuit by removing the negative terminal before the positive. Use a marine-rated disconnect switch if you have one, and secure all wires neatly to prevent damage or shorts while stored.
Ideal Storage Conditions
While your battery’s fully charged and ready to go, resist the urge to leave it plugged in or stashed away at full power—storing it properly is just as important as charging it right.
Charge to 50–60%, then store in a cool, dry place between 40°F and 77°F.
Keep it indoors during winter, enable deep sleep mode, and avoid humidity, vibration, and freezing temps to maximize lifespan.
Final Note
You’ve matched your charger to your battery’s chemistry, checked the voltage, and cleaned the terminals—great job. Now, just remember to connect red first, then black, and let your smart charger do the work. Keep an eye on the indicators, unplug in the right order, and store your battery in a cool, dry place. You’re all set for reliable power on your next trip.


